
Features
Tickets
Every piece of work in Worklynq is a ticket — a checklist, a repair, a supplier order, an RFI, a bug. This page covers finding and filtering tickets, creating them, editing many at once, and setting up each type of ticket: the fields it asks for, the sections it shows, and how it moves from start to finish.
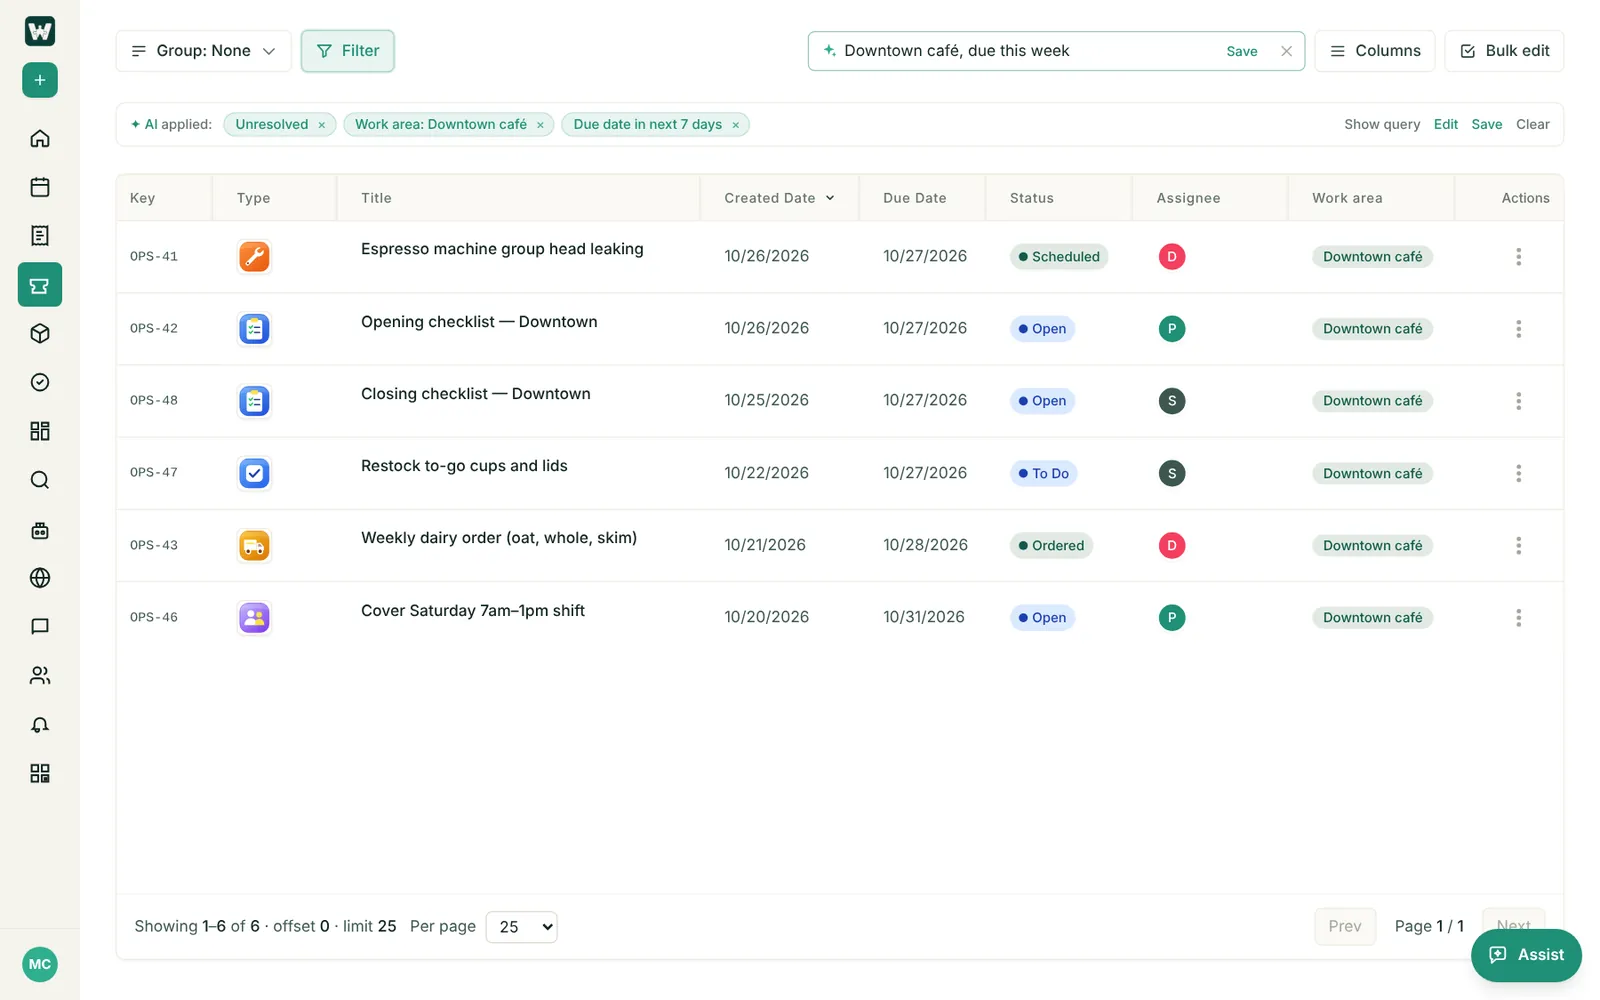
The tickets list
- The list fills your screen. Columns are sized to be readable, and the Title takes the rest of the width.
- Drag a column’s edge to resize it — including making the Title narrower, so long titles are cut short. Your widths are remembered. Double-click a column’s edge to put it back to automatic width.
- On a smaller screen, or with Assist open beside the list, the Title keeps a readable width first, and the Created and Updated dates step aside until there’s room. Your own column settings don’t change.
- Sort by any column, and click a ticket to open it.
- Columns lists the fields you can show, from the same field list as Fields and Filters: the default fields first, then Built-in and custom fields such as Environment, Steps to reproduce or Vendor. The Work area column shows the store, project, product or approval space, and Team shows the ticket’s team. Parent / children, time logging and sprint history are sections on the open ticket, not columns.
- Filter opens the Filters panel: describe what you want, pick a quick filter, build conditions, and manage your saved filters.
Search with Ask AI
Type what you’re looking for in plain words in the Ask AI box in the toolbar (on a narrow screen it gets its own row under Group, Filter, Columns, and Bulk edit) — for example “my open repairs due this week”, “all operations tickets”, or “overdue at Downtown” — and press Enter. Worklynq turns it into filter conditions and shows the matching tickets.
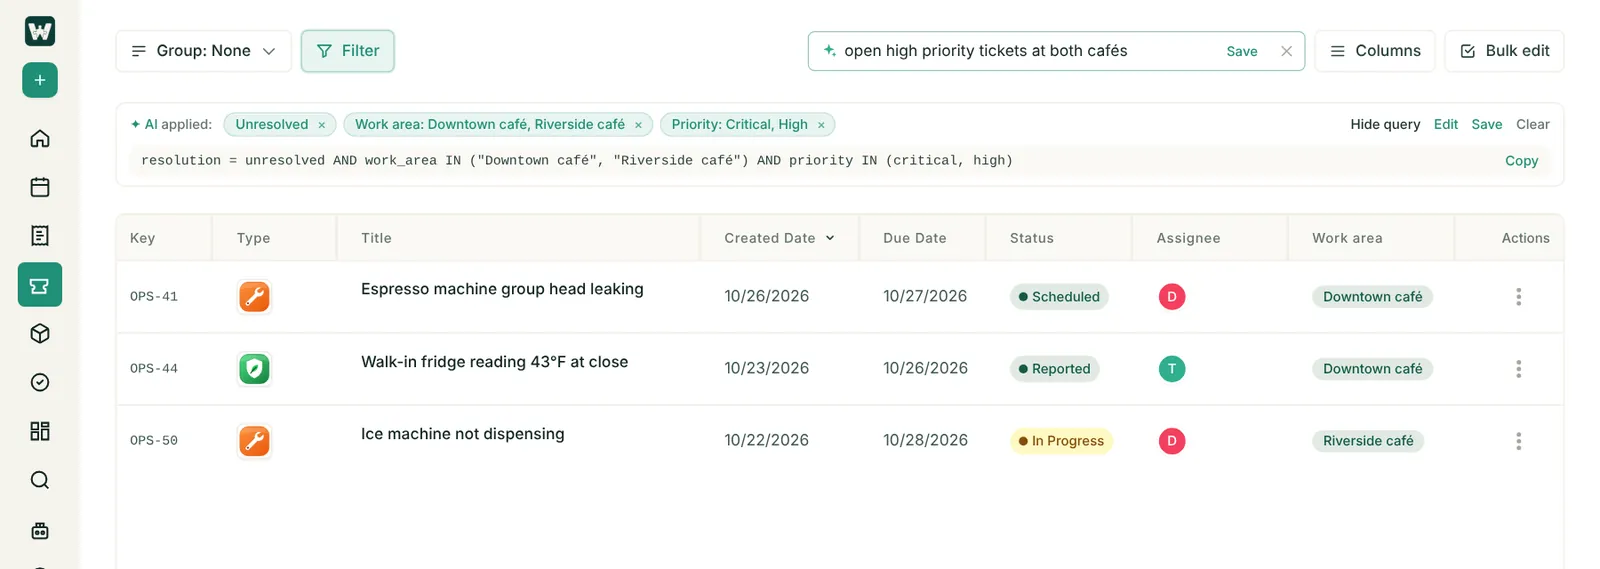
A bar under the toolbar shows exactly what was applied, as chips — ✦ AI applied: Unresolved · Work area: Downtown café, Riverside café · Priority: Critical, High. Then:
- Click × on a chip to drop that condition.
- Show query reveals the search as a Worklynq Query, with a Copy button.
- Edit opens the conditions in the Filters panel to adjust them; Save keeps them as a saved filter; Clear goes back to the full list.
- “Open” means not finished. Ask AI reads open and closed from each ticket type’s workflow: a ticket is resolved once it reaches one of its type’s end stages, whatever that stage is called.
- It knows your work. It only uses your real statuses, ticket types, work areas, sprints, and releases, and it understands kinds of work — “operations tickets” means the tickets at all your locations.
- If AI isn’t available, Worklynq searches by keyword instead and says so.
Filters
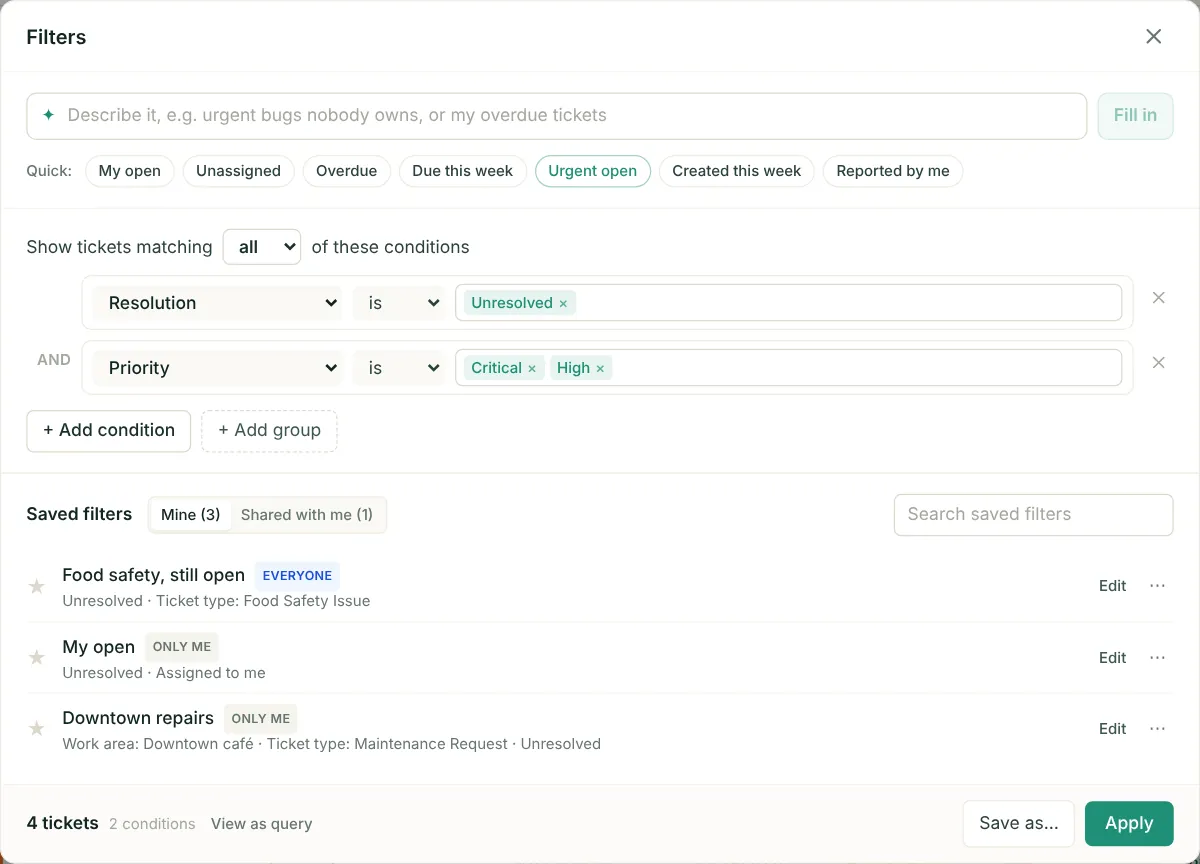
Click Filter in the toolbar. Everything is on one page:
- Describe it. Type what you want, like “urgent bugs nobody owns”, and click Fill in. It uses the same AI as the Ask AI box, so the same words find the same tickets. The conditions below fill in for you to check, and the panel runs the AI’s exact search until you change one of them. If the AI can’t work out conditions, it searches by keyword instead and says so.
- Quick filters: My open, Unassigned, Overdue, Due this week, Urgent open, Created this week, and Reported by me.
- Conditions. Choose to show tickets matching all or any of your conditions. Each one reads like a sentence — a field, then is, is not, is empty, contains, in the last / next N days, before, after, between, and so on — and you pick values from your real statuses, people, work areas (the Work area condition), teams, sprints, releases, and fields, including your own custom fields. + Add group nests a block with its own all/any, for example assigned to me AND (priority is High or Critical OR overdue).
- A date range from the AI becomes one between condition that includes both end days, and “yesterday” reads as yesterday.
- The footer shows how many tickets match as you go. View as query shows the Worklynq Query; Save as… names the filter and shares it with Only me or Everyone; Apply shows the tickets.
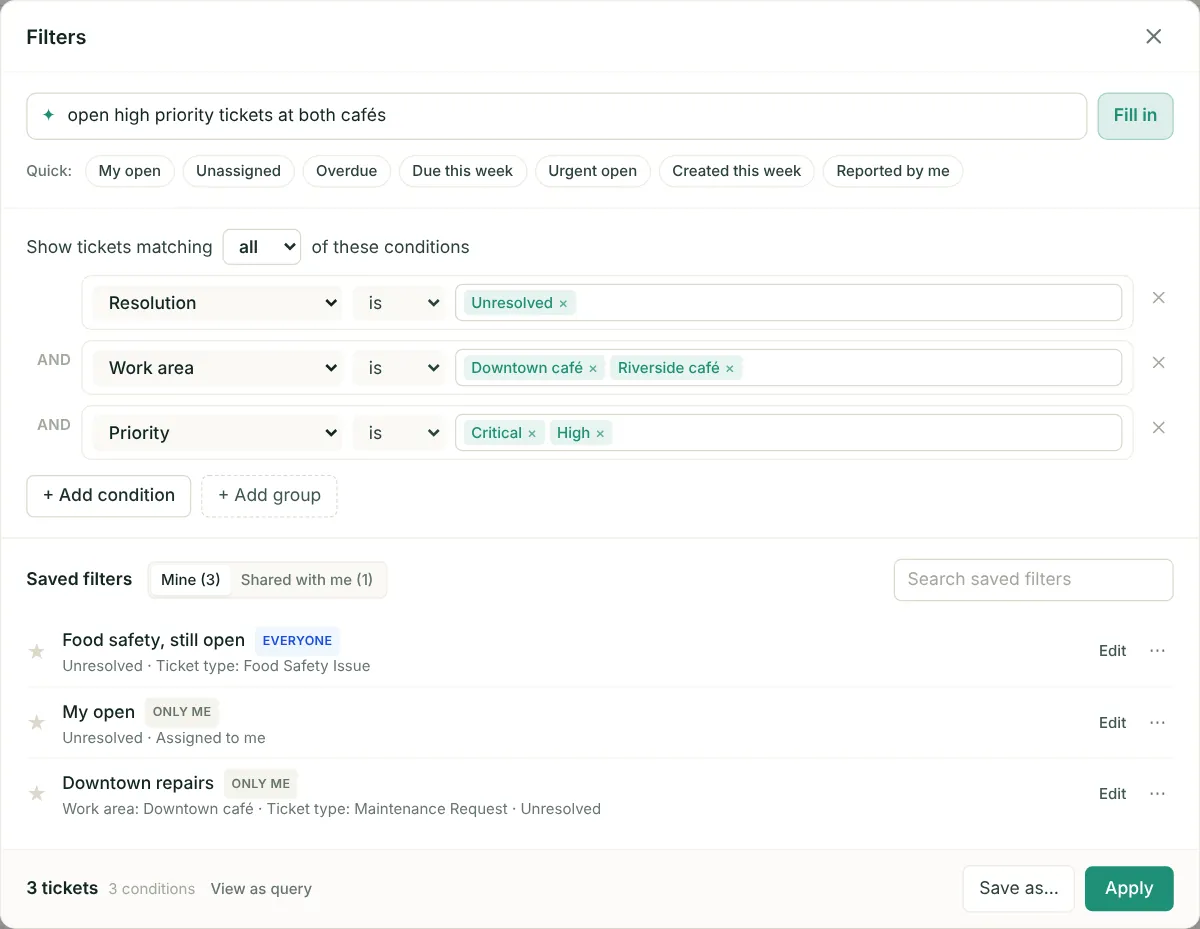
In a typed Worklynq Query the condition is work_area, as in work_area = "Downtown café". Older saved filters and links that use project or product keep working and open in the panel as Work area.
Saved filters sit at the bottom of the panel, under Mine and Shared with me, each with its conditions in plain words. Click one to apply it. Its menu lets you Edit it (then Update filter or Save as new), Rename, Share with everyone or Make private, Duplicate, Copy query, or Delete; renaming, sharing and deleting are for your own filters. Click the ★ to make a filter your default.
Know the query language? A saved filter or link with a hand-written Worklynq Query still works, even when it’s too complex to show as conditions — the panel shows it as a read-only query.
Create a ticket
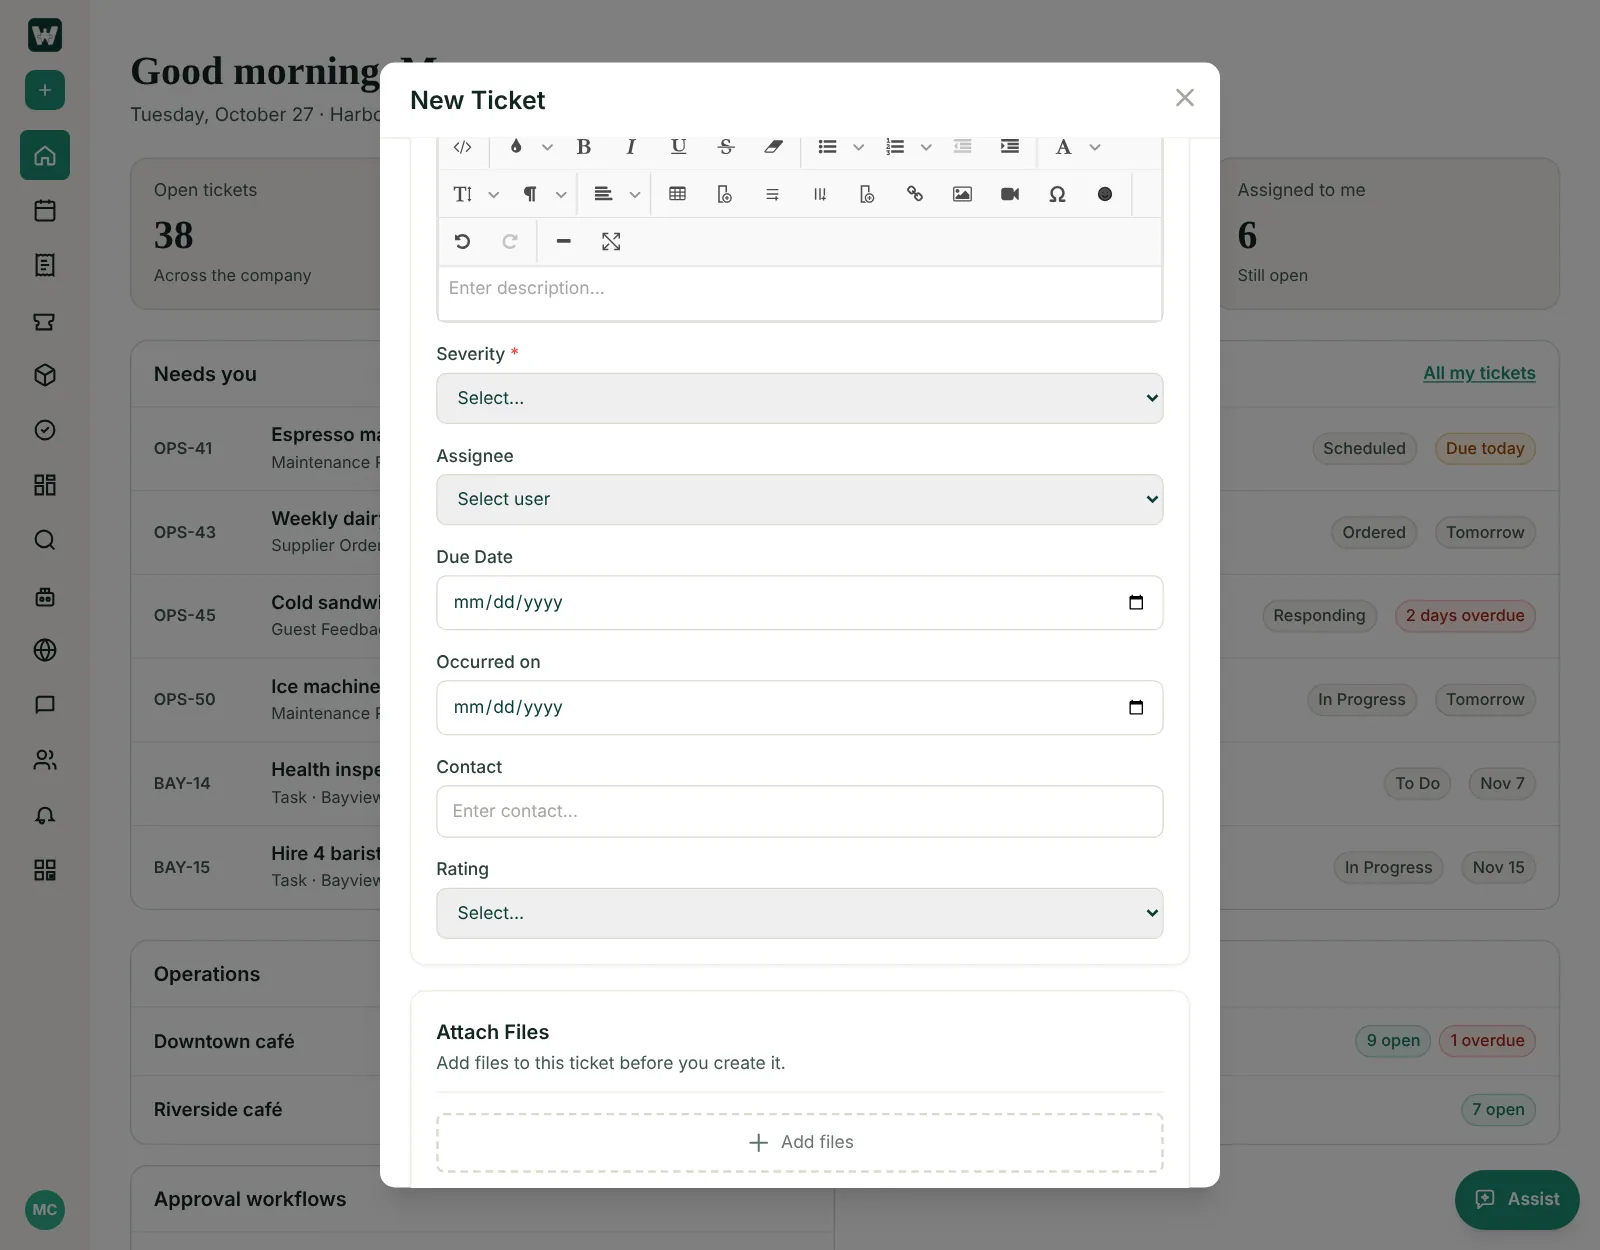
Click + at the top of the sidebar, or New ticket on a page. Pick the Work area — the store, project, product, or approval space the work belongs to — then the Ticket type. Only the types mapped to that work area are offered. If you see No work area available, you haven’t been given access to any yet — ask your administrator.
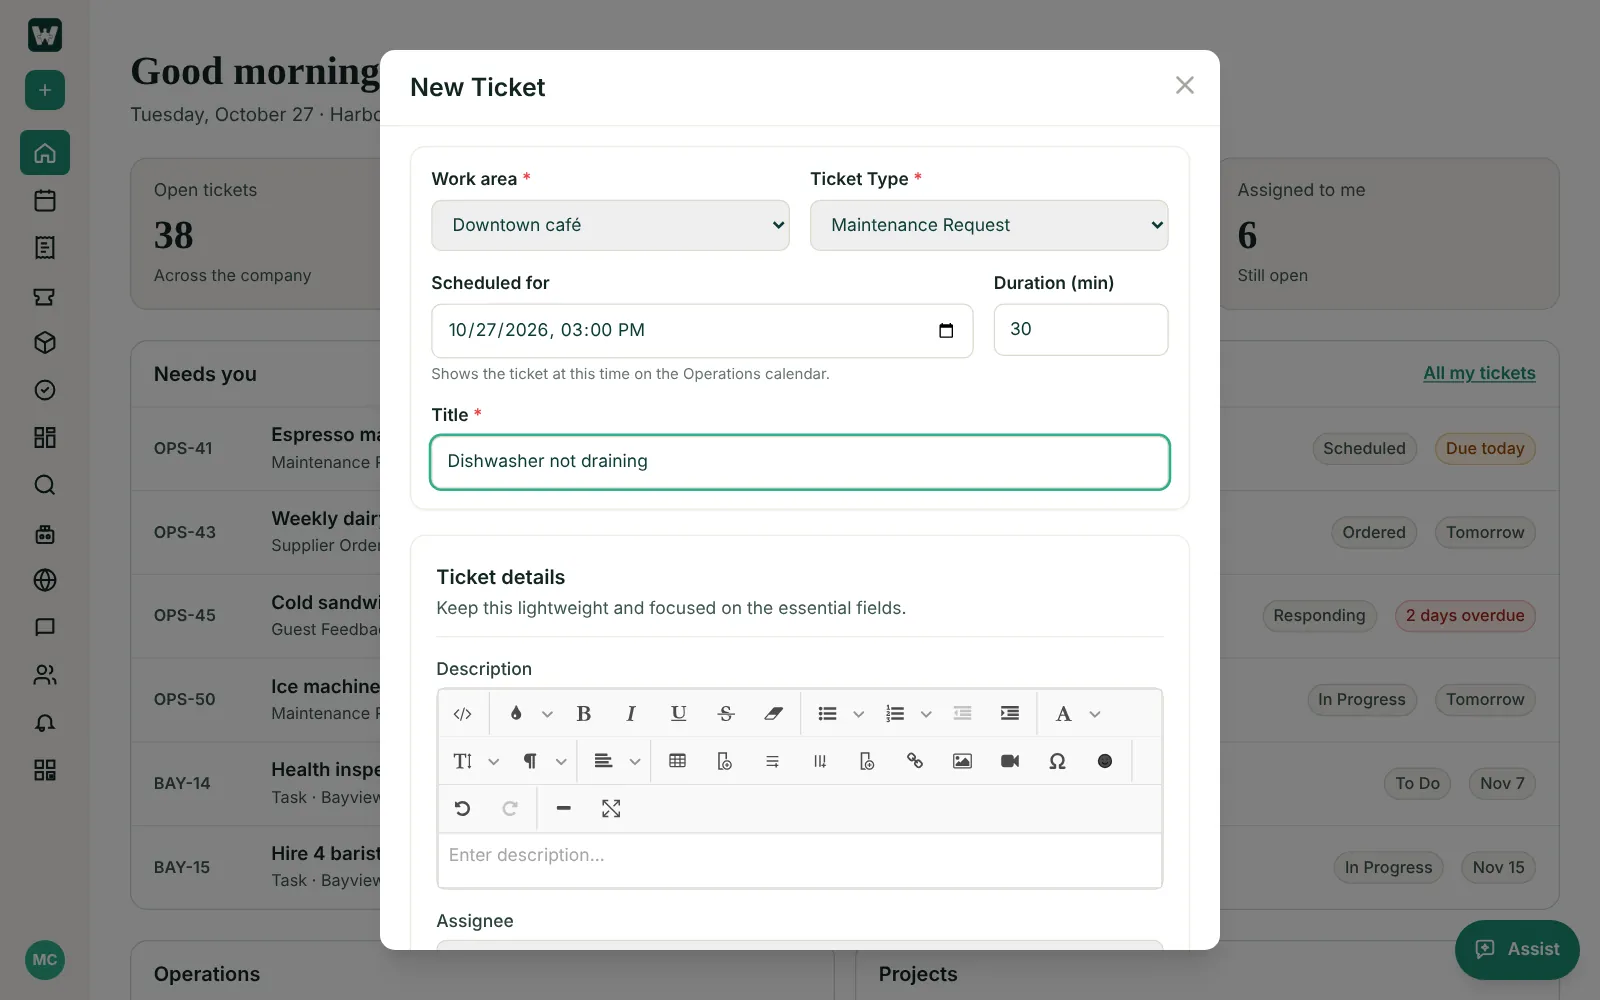
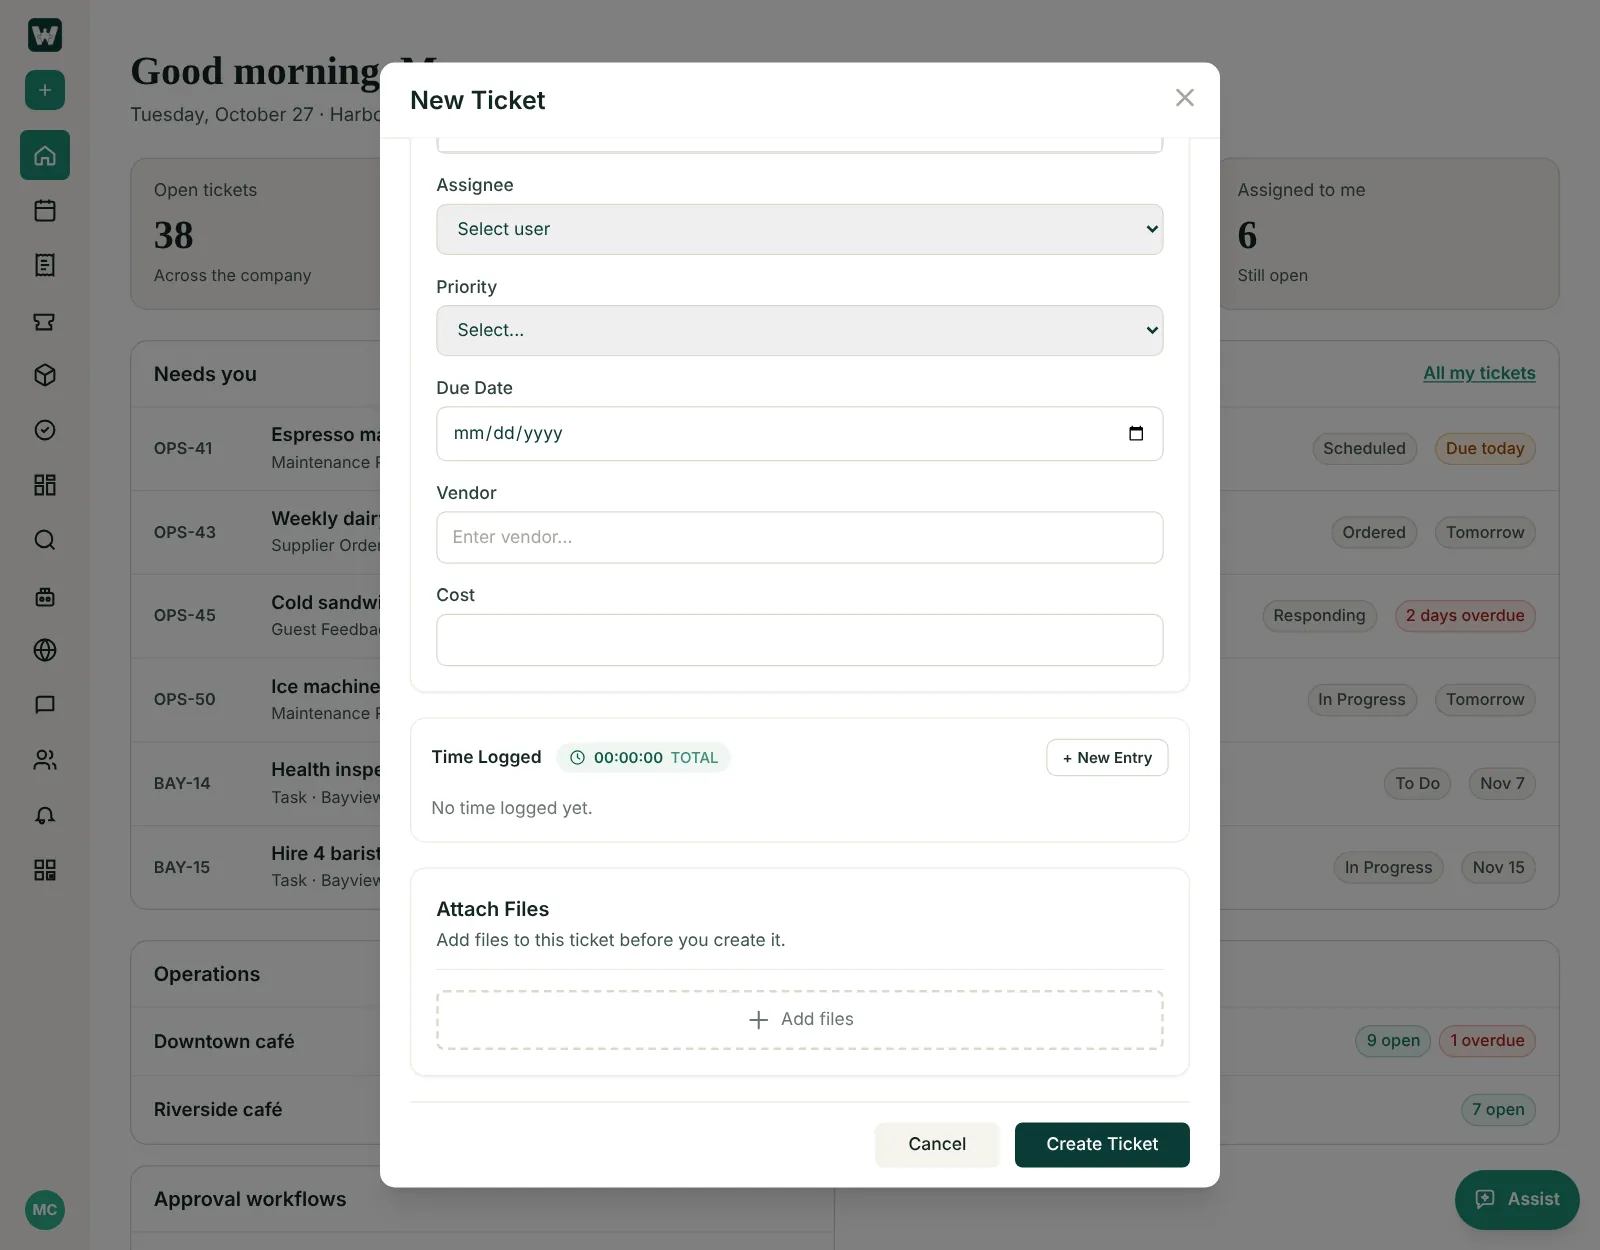
The rest of the form asks for the fields that suit that type of ticket — see Fields for each type of ticket — followed by any sections the type has, such as Attach files.
For a product, the release fields list that product’s versions from Product Releases, each as its number and name, like 3.2 — Order ahead for groups:
- Target release — the version the work will ship in. It lists versions not released yet, plus the ticket’s current version if that has shipped since. Picking one puts the ticket in that version and on its dashboard.
- Found in release — the version where a bug was found. It lists every version, released ones included, and marks the released ones.
The same lists are used on the open ticket and in bulk edit.
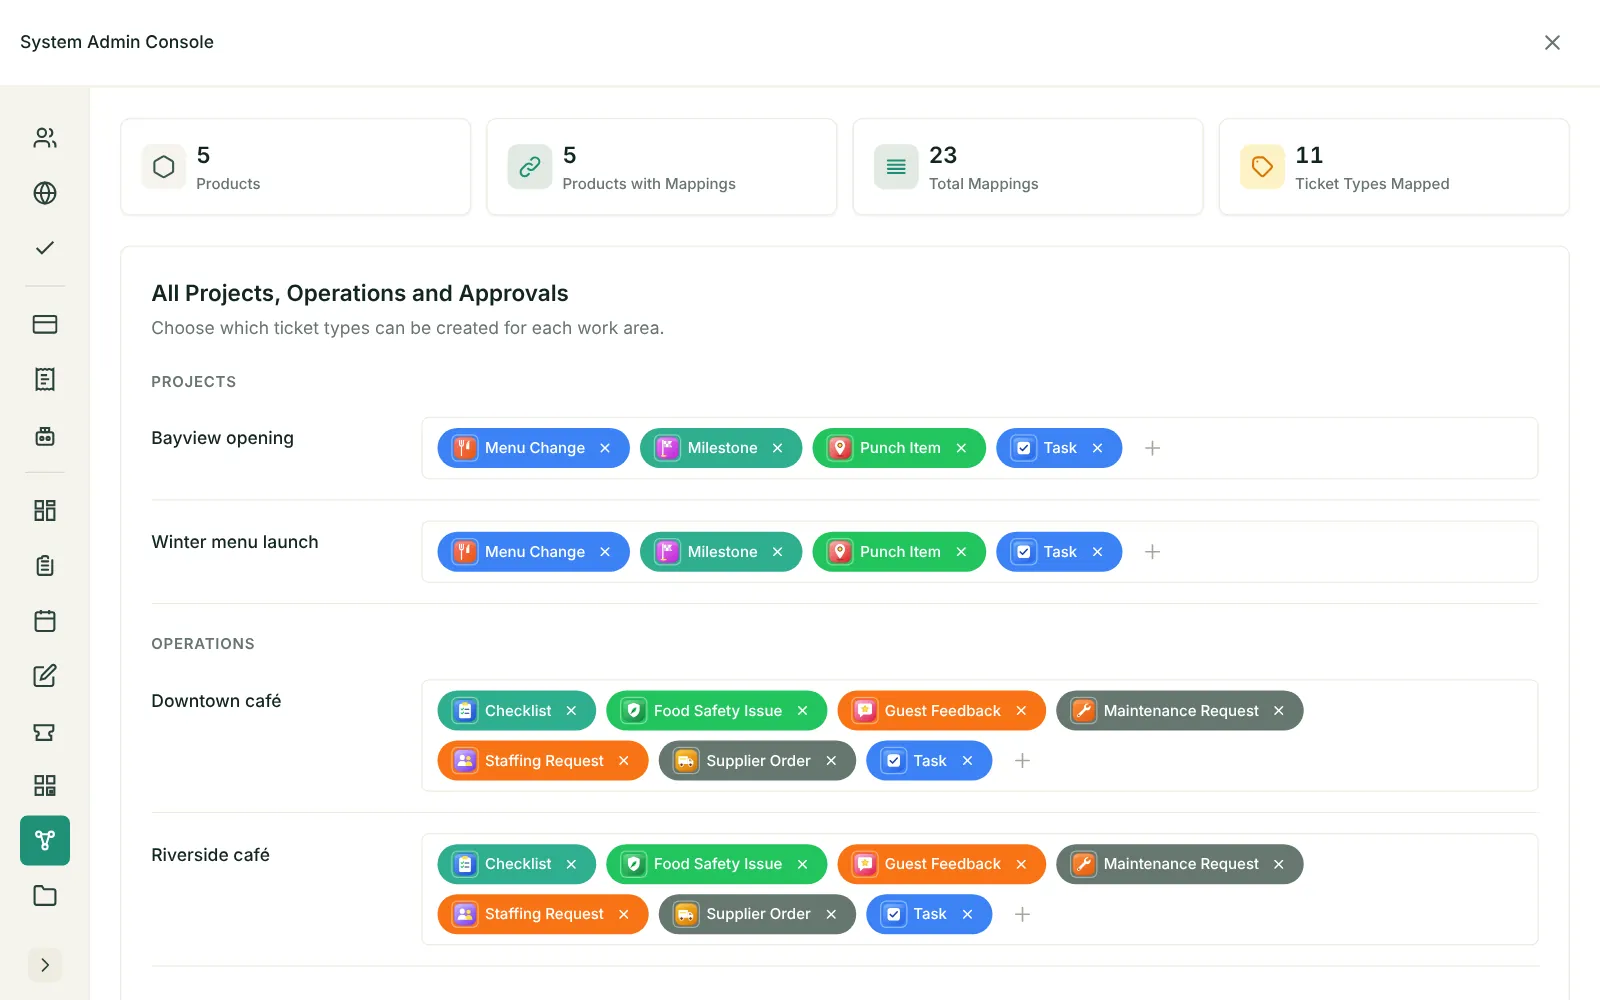
Your System Admin chooses which ticket types each work area can use in Admin console → Work Configuration → Ticket Type Mapping.
Edit many tickets at once
Super admins can change several tickets together — for example, move a week’s checklists to Done or reassign a batch of repairs.
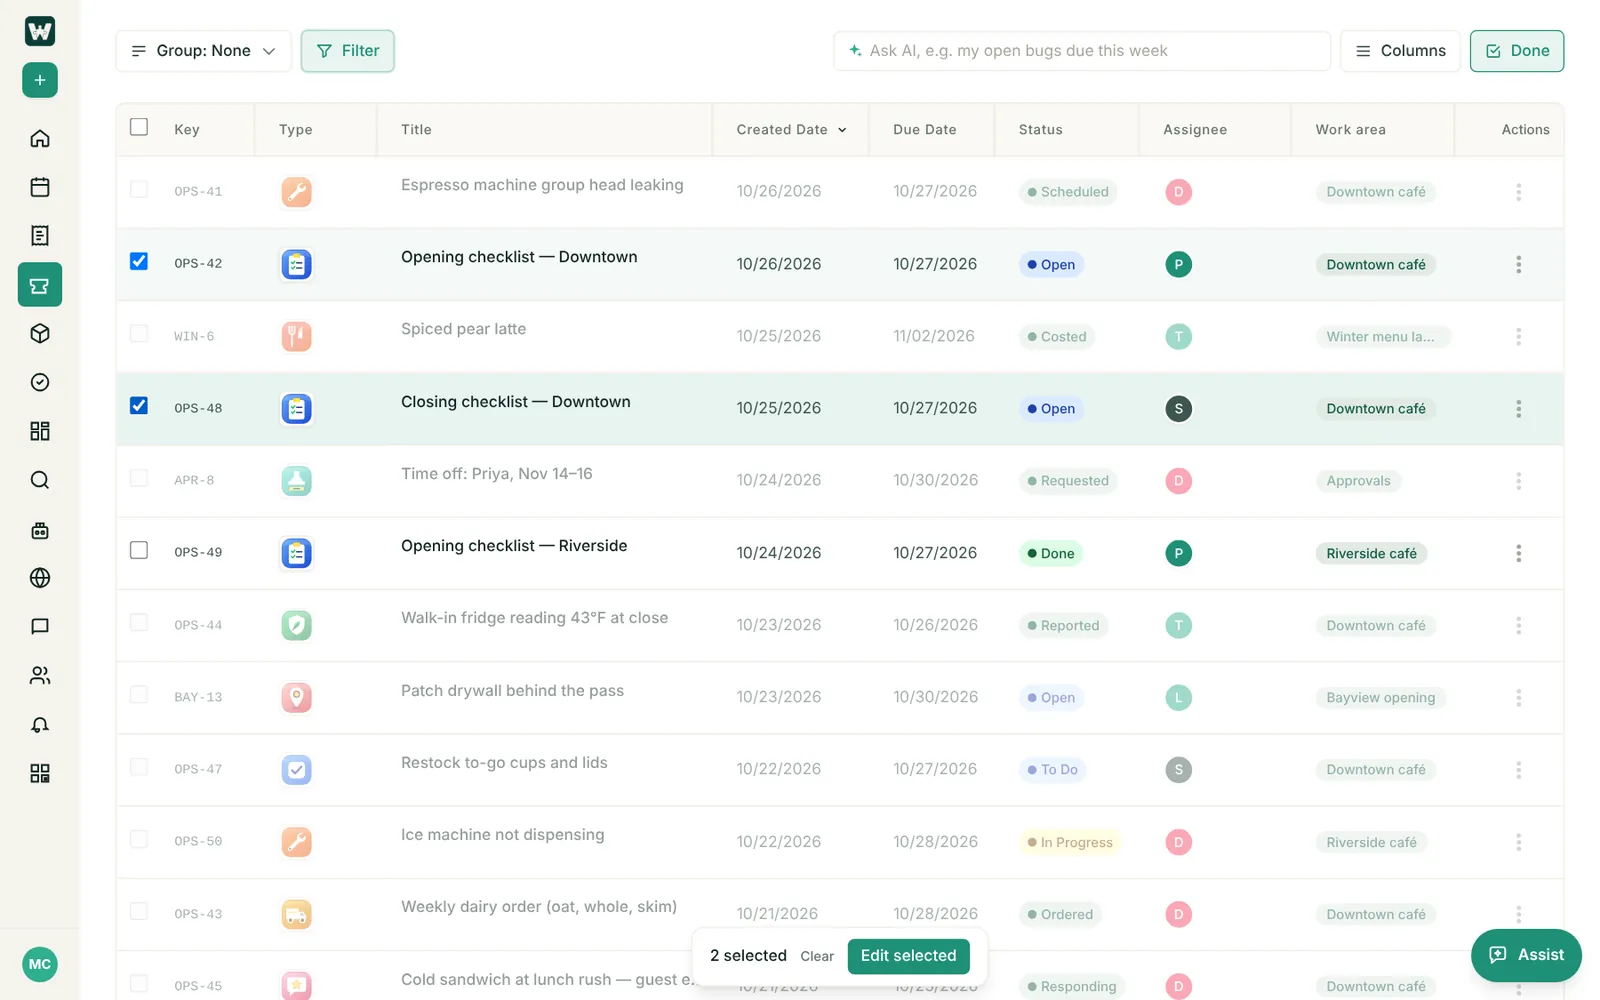
- On the tickets list, turn on Bulk edit. Checkboxes appear.
- Tick the first ticket. Only similar tickets — the same work area and the same ticket type — stay selectable; the rest are dimmed.
- Tick the others, or select all similar tickets on the page.
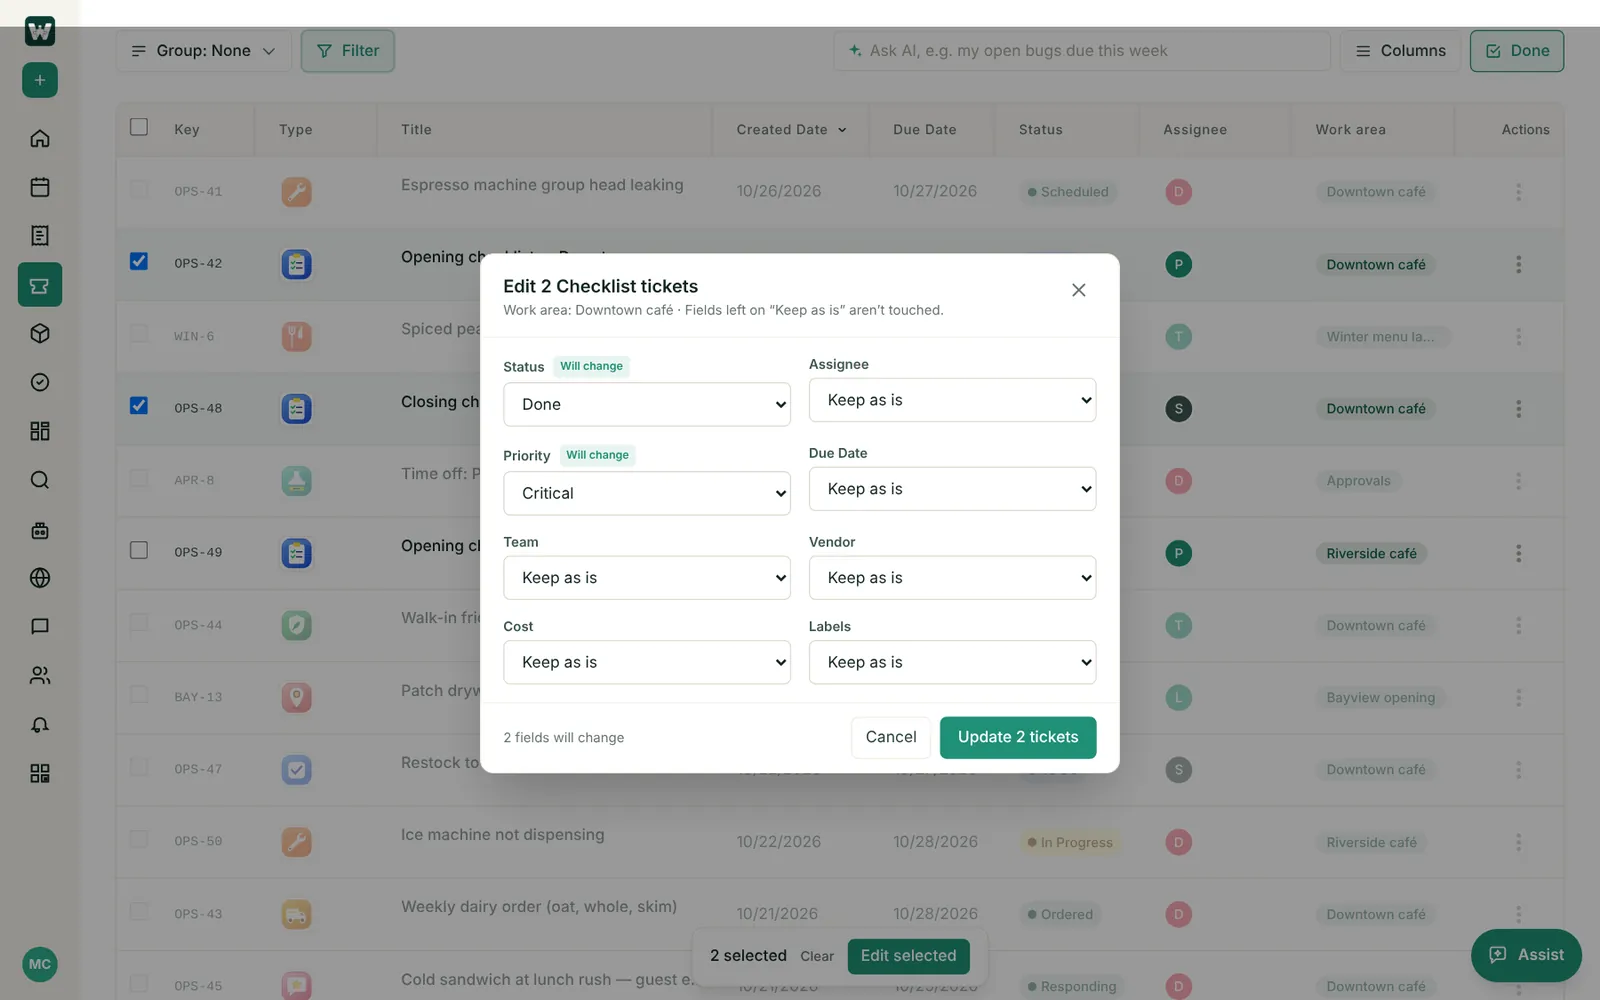
- Choose what to change. The dialog offers Status (from that type’s workflow) plus the fields on that type’s Edit / View screen, in the same order — so a checklist offers different fields from a bug. Every field starts at Keep as is; you can also set a new value or clear it.
- Save. Worklynq updates every selected ticket.
- What you can change: priority, severity, assignee, owner, due date, sprint, labels, points, Target release and Found in release, plus the type’s built-in and custom fields — text, number, date, yes/no, dropdown, multi-select and people.
- The release fields appear only when all the selected tickets are in the same product.
- Fields that can’t be bulk edited, such as rich text and Components, are named in the dialog so you know to change them one ticket at a time.
Fields for each type of ticket
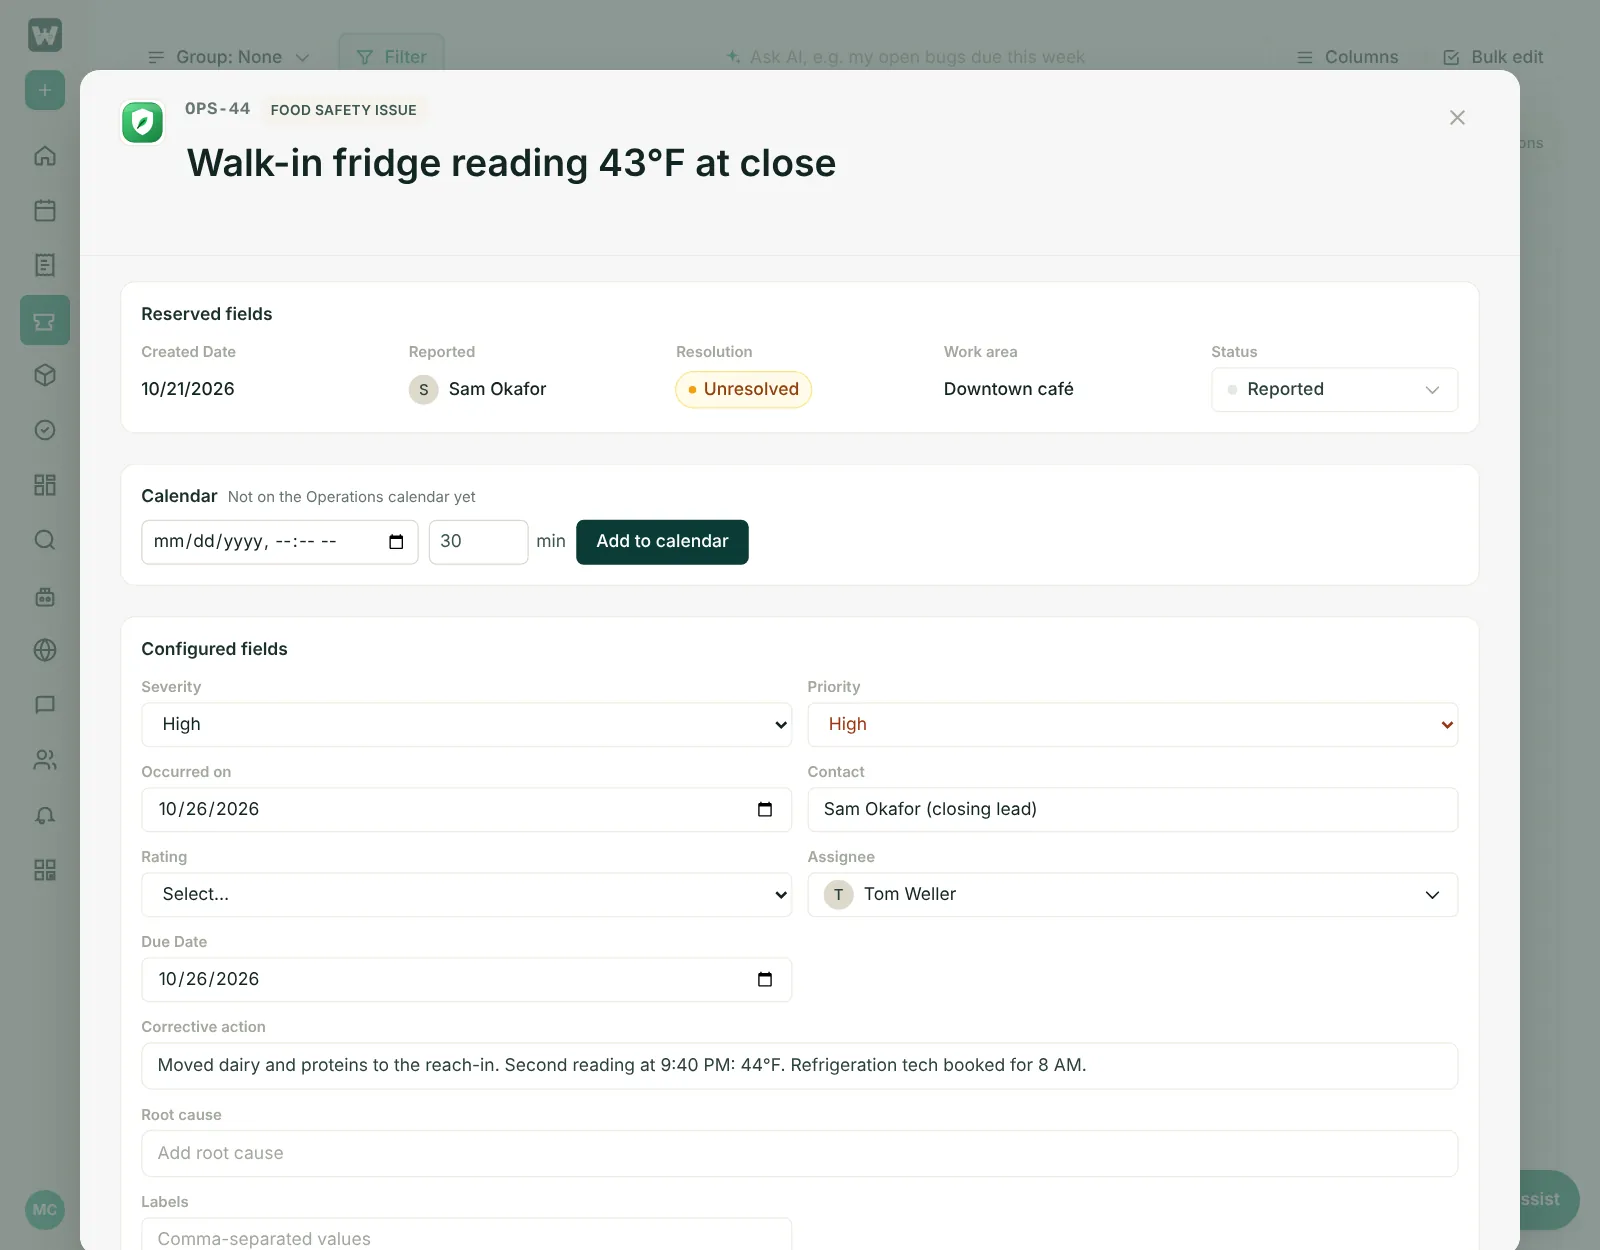
Every ticket type asks for the fields that fit its kind of work, and nothing else. A food safety issue asks when it happened and who reported it; a bug asks for the environment and steps to reproduce; an approval asks for the amount. Title and Status are always there, and * marks a required field.
| Kind of ticket | For example | Fields of its own |
|---|---|---|
| Operations task | Checklist, Maintenance Request, Supplier Order, Menu Change | Vendor, Cost |
| Operations issue | Food Safety Issue, Guest Feedback | Severity*, Occurred on, Contact, Rating, Corrective action, Root cause |
| Approval | Approval Request | Assignee* (the approver), Amount, Decision notes |
| Service / support | Service Ticket | Requester*, Channel, Resolution notes |
| Content / creative | KB request, Media Creation request | Platform*, Publish date, Approver, Asset link |
| Engineering issue | Bug | Severity*, Environment*, Steps to reproduce, Expected and actual result, Device, Root cause |
| Engineering work | Story, Task, Feature, Spike | Acceptance criteria, Estimate, Start date, plus sprint and release |
| Engineering planning | Epic | Objective*, Start date, Estimate |
| General | Anything else | Description, assignee, priority, start and due dates, labels |
Worklynq picks the kind from the ticket type’s name, its description, and the work areas it’s used in. A Task on a software product gets the engineering fields; a Task at a café gets the general ones.
Change the fields
Your System Admin can turn any field on or off, or make it required, in Admin console → Work Configuration → Ticket Type Screens: pick the ticket type, then the Create or Edit / View screen.
- A type nobody has set up yet uses its recommended fields, and the page says Recommended layout: ….
- A type you’ve already set up keeps your choices. Reset to recommended (click twice to confirm) replaces its Create and Edit / View screens with the recommended fields; your custom fields stay as they are.
- New fields Worklynq adds later arrive switched off, so your forms don’t change on their own.
Components for each work area
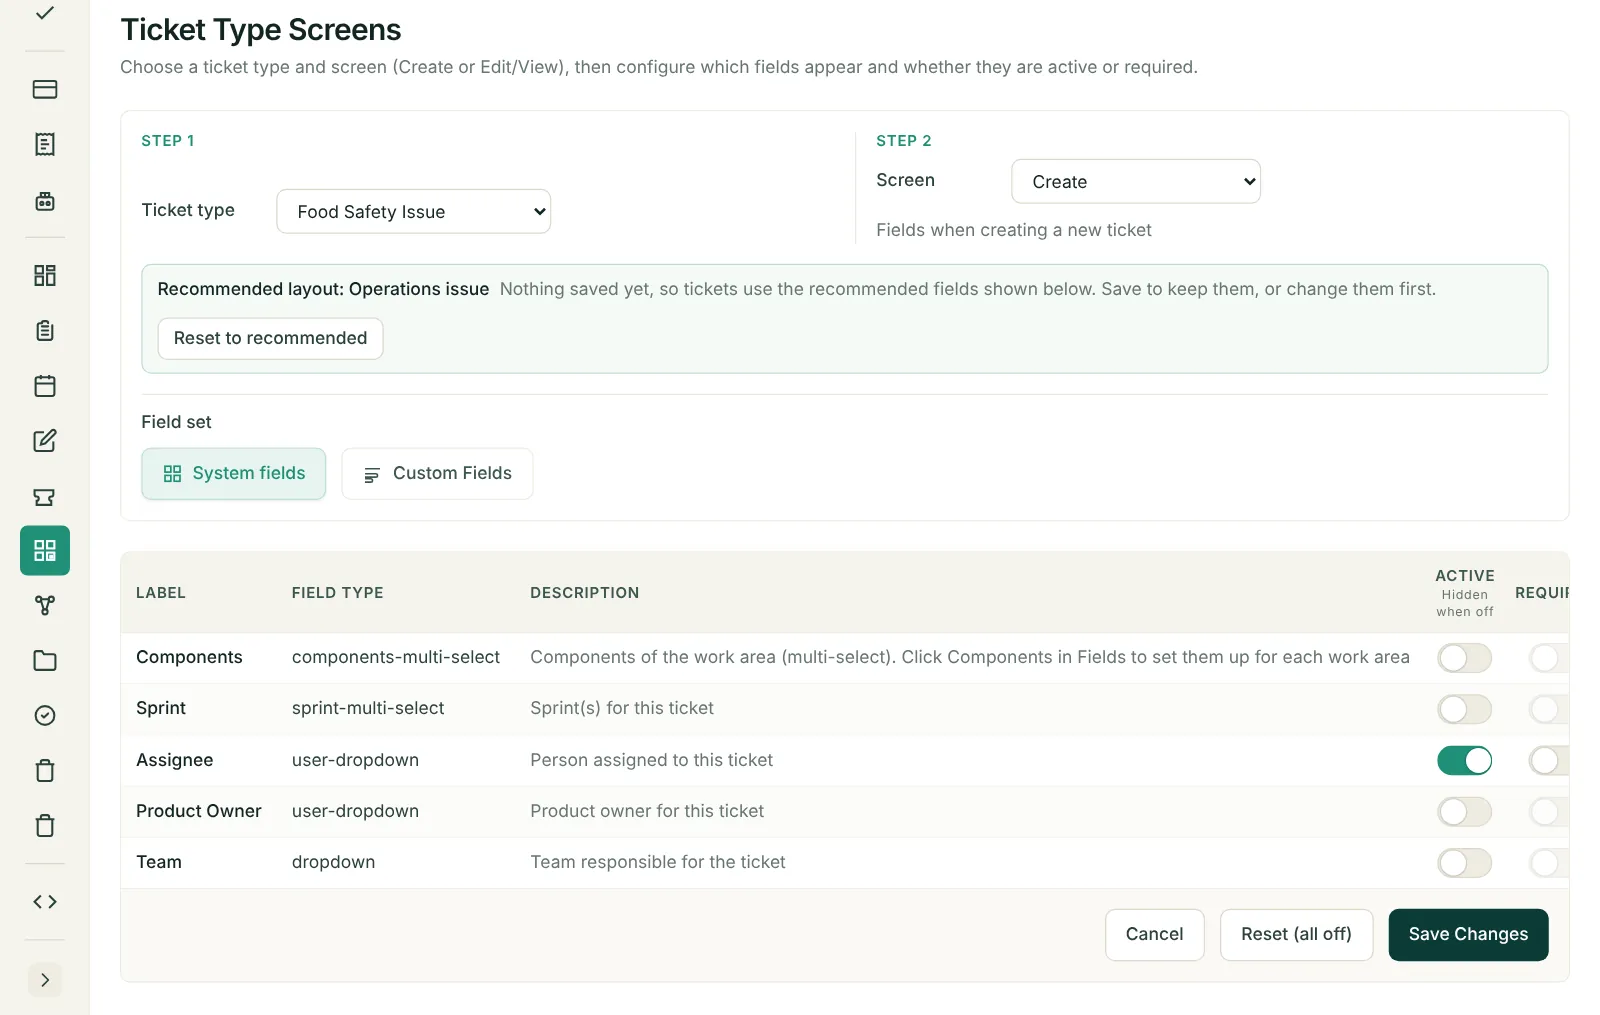
The Components field lets a ticket name the part of the work area it’s about — the espresso machine at Downtown café, the kitchen at a site. Each work area has its own list.
- Open Admin console → Work Configuration → Fields → System fields and click Components (Configure per work area).
- Components by work area lists every product, project, location and approval space, grouped by kind, with how many components each has. Search, or pick one and click Configure.
- Add components, group them into categories, set an owner for each, and drag to reorder. They’re saved on that work area only.
How tickets move: workflow types
Each ticket type has its own stages, and one of three workflow types decides how a ticket can move between them. Your System Admin sets this in Admin console → Work Configuration → Ticket Types.
| Workflow type | How tickets move | Good for |
|---|---|---|
| Linear | One stage up or down at a time, without skipping. | Checklists, repairs, supplier orders |
| Free flow | From any stage to any stage. | Simple tasks, guest feedback |
| Custom | You choose where each stage can go next, so the workflow can split into branches and loop back. | Reviews, approvals, anything with a “send it back” step |
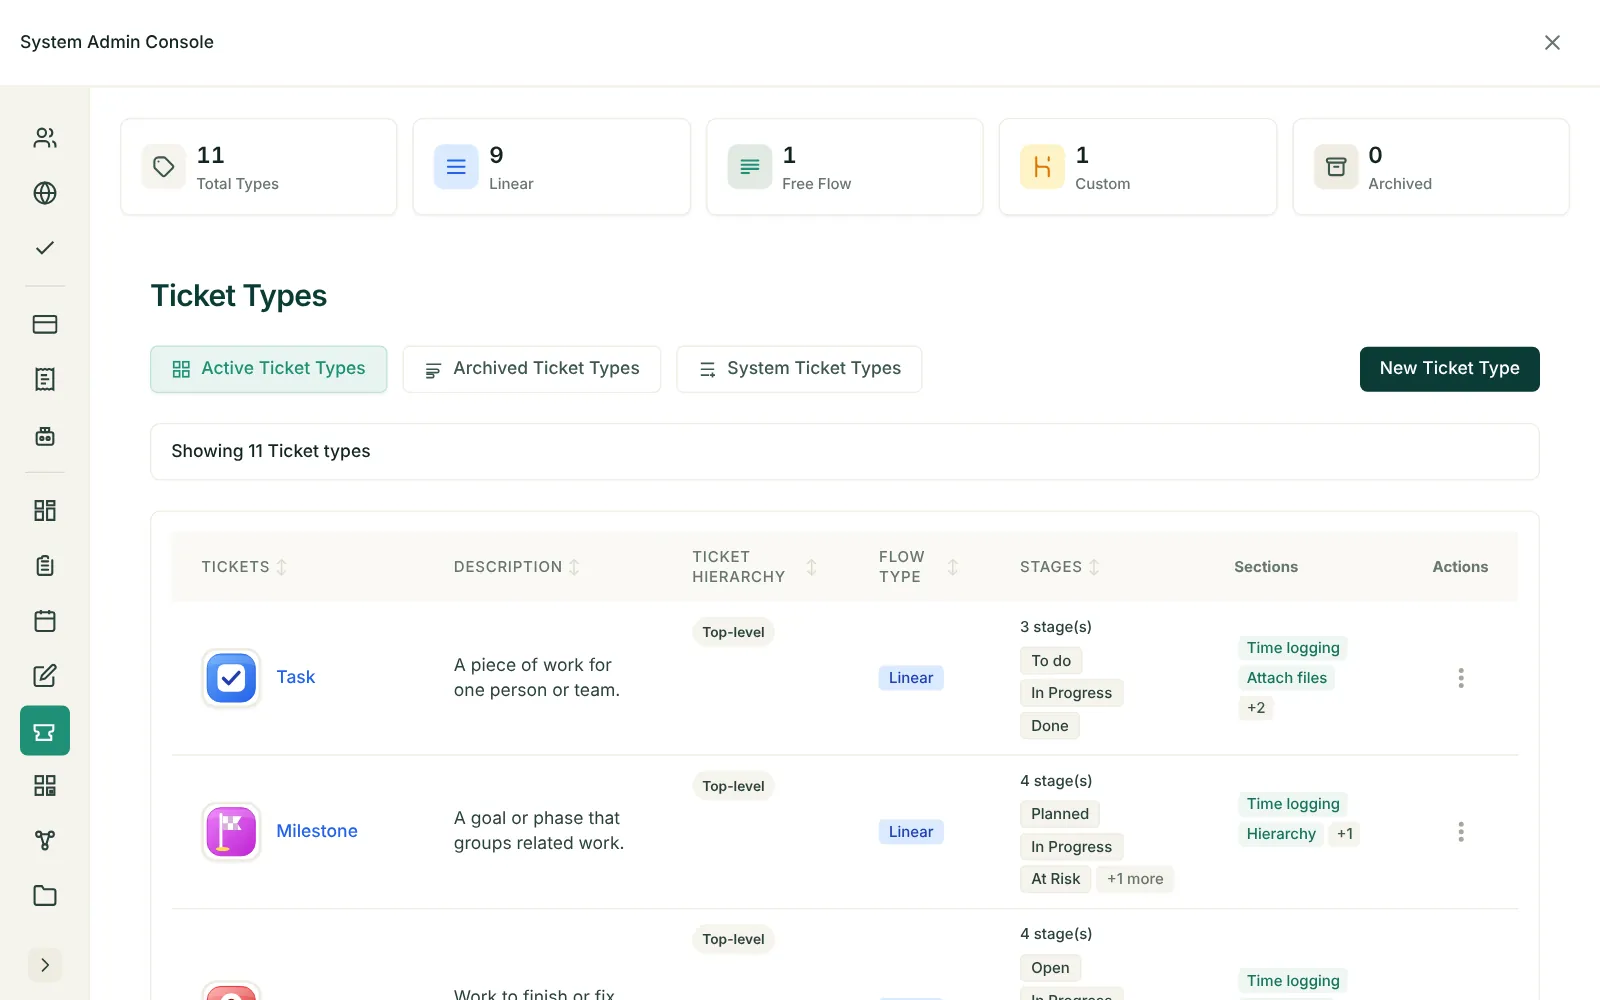
Every workflow has a starting stage, up to five stages in the middle, and up to four end stages. A ticket counts as resolved once it reaches an end stage — that’s what Unresolved and “open” mean in filters and Ask AI. Each end stage is marked as a success, a failure, or cancelled — so a request can end Approved, Rejected, or Withdrawn, and Home and reports know which way it finished.
Control the sections on a ticket
Besides its fields, a ticket can have sections: larger parts that each ticket type turns on only if it needs them. Your System Admin chooses them for each ticket type.
| Section | What it adds to the ticket |
|---|---|
| Built-in | |
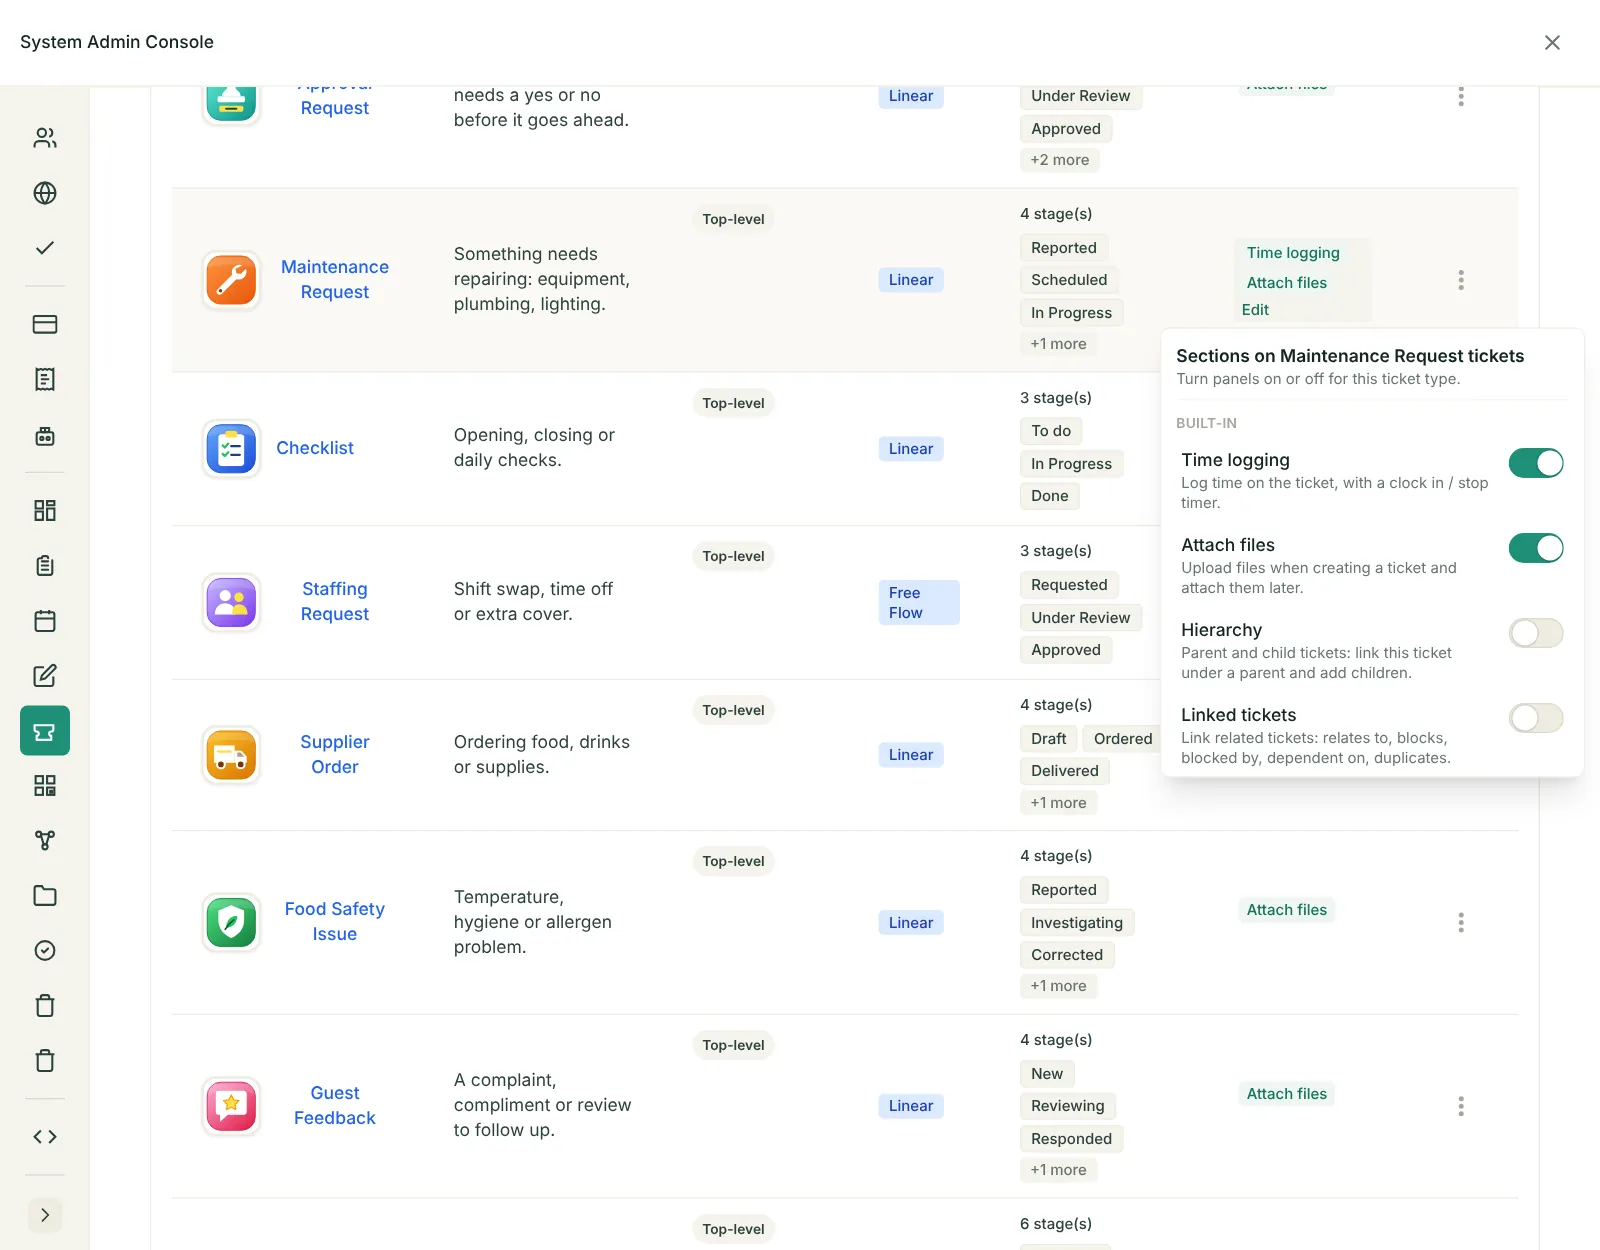
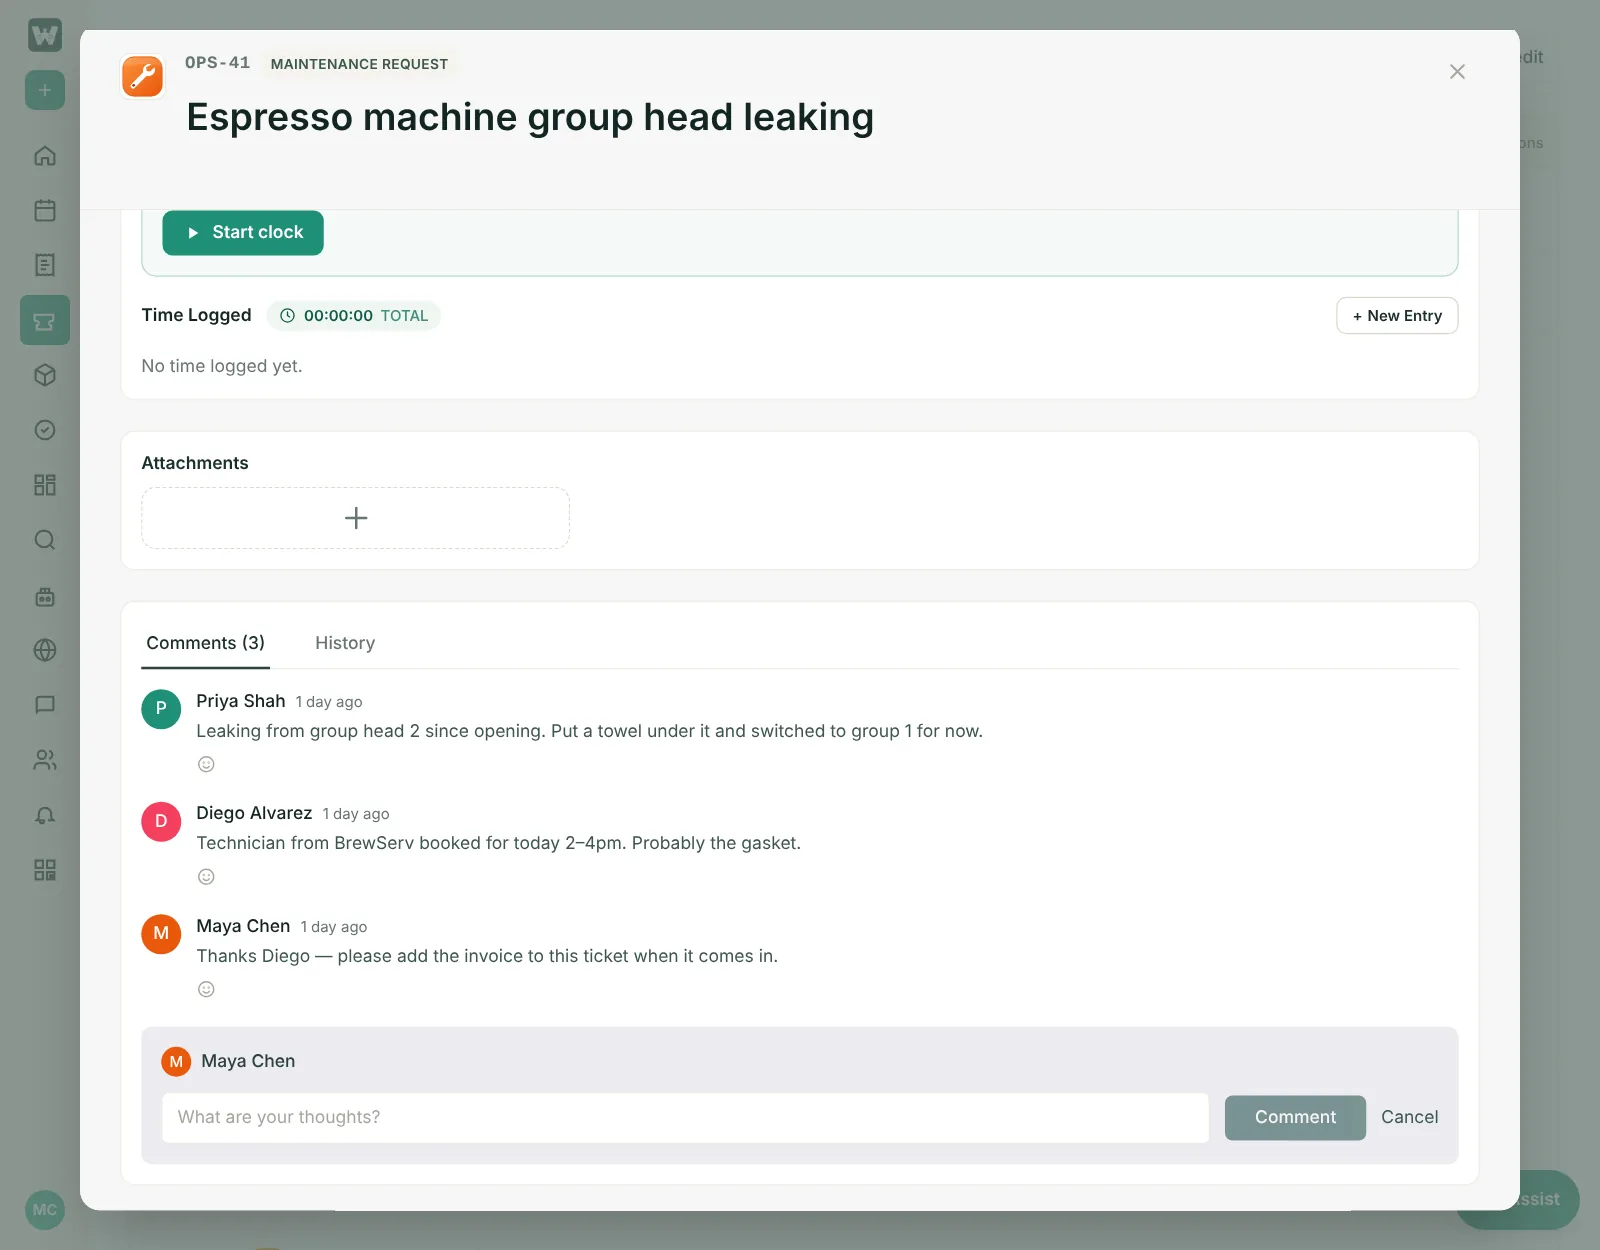
| Time logging | A clock in / stop timer and time entries, with the total time logged. |
| Attach files | Upload files when you create the ticket, and attach more later. |
| Hierarchy | Parent and child tickets: put the ticket under a parent, or add children to it — a milestone and its punch items, an epic and its stories. |
| Linked tickets | Link the ticket to related ones: relates to, blocks, blocked by, dependent on, duplicates. Shows on the open ticket. |
| Apps (once connected) | |
| GitHub | Branches, commits, and pull requests linked to the ticket. |
| Claude agent | Hand the ticket to a Claude coding agent and follow its progress. |
| Cursor agent | Hand the ticket to a Cursor cloud agent and follow its progress. |
Every section starts off. A new ticket type, and an app you’ve just connected, shows no sections on any type until you turn them on. That keeps simple tickets simple: a checklist doesn’t need a timer or file uploads.
Turn a section on or off
- Open Admin console → Work Configuration → Ticket Types. The Sections column shows the sections each type has, or None.
- Click the type’s Sections cell (or Edit under it). A panel opens, titled Sections on … tickets, with Built-in and Apps groups.
- Switch each section on or off. It saves straight away.
- Apps you haven’t connected are greyed out, with an Open Apps link to connect them first.
Where sections show
- Everywhere the ticket does. A section that’s on shows on New Ticket and on the open ticket; one that’s off is hidden from both, for every ticket of that type, old or new. Sections aren’t fields, so they’re not in Ticket Type Screens or the Fields list — this switch is the only one.
- Nothing is deleted when you turn one off. Files, logged time, parent and child links, and linked tickets are kept, just hidden. Turn the section back on and they show again.
- Apps follow the switch too. When the Claude or Cursor section is off for a type, that type’s tickets can’t be handed to the agent, including by stage automations.
Build a branching workflow
For example, a Menu Change goes from Proposed to Tasting; after tasting it can be sent back with Changes requested, move on to Costed, or be Rejected.
- Open Admin console → Work Configuration → Ticket Types and edit the type.
- Set Workflow type to Custom. It starts from the type’s current one-step-at-a-time moves.
- Set up the stages as usual: the start, the middle stages, and the end stages.
- In Branches, each stage lists the other stages as chips. Select the stages a ticket may move to next. The diagram above shows the result — moves forward as solid lines, moves back as dashed lines.
- Save. Worklynq won’t save a workflow with a stage that no path reaches from the start, or a working stage with nowhere to go next. End stages can have no moves out, or some to allow reopening.
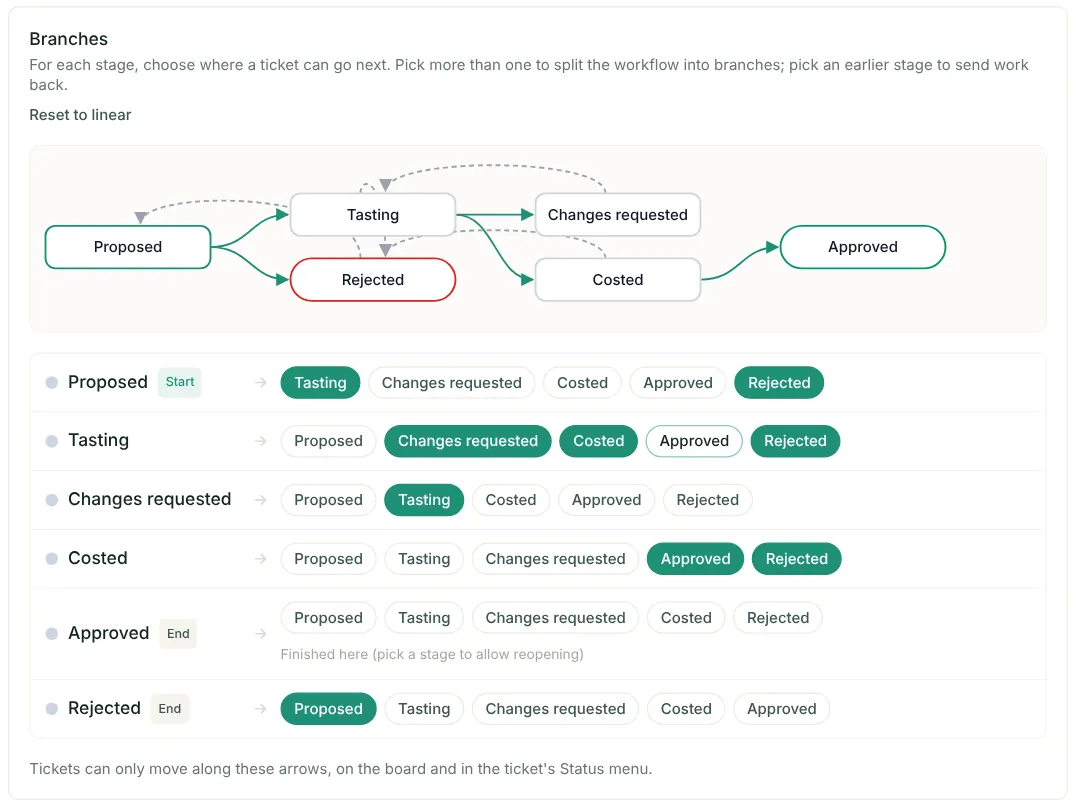
Where the rules apply. On the board, dragging a card to a stage the workflow doesn’t allow shows This workflow doesn’t go from X to Y. On a ticket, the status menu greys out stages that aren’t a next step. Stage automations aren’t limited by the branches, and Linear and Free flow types work exactly as before.
Want a quick start? Reset to linear puts back the one-step-at-a-time moves, and you can add branches from there.
Last updated: November 6, 2026. Questions? info@cohesync.com